Look for a recessed RESET switch so you won’t hit it by accident with your knee.
Most computers nowadays come in mini tower cases that can fit on the floor or desktop. Cases usually come in boring shades of beige. For (or less for multiples) you can have your computer, monitor and keyboard painted with a special plastic coating in any colour you want. The new Pentium IV motherboards require a slightly deeper case than usual. If you buy a new case, you probably should get that extra room just in case. Make sure your case and motherboard are compatible. Most cases and motherboards are ATX (Advanced Technology Extended) form factor. Motherboards are shrinking all the time, and cases are shrinking with them. There are also mini-ATX and micro-ATX cases.
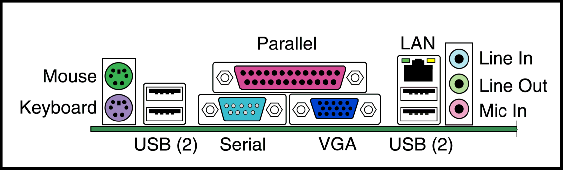
The ATX spec, does not specify what I/O connections must be available on the back panel, but here is what they typically look like:
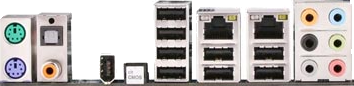
A more modern motherboard might present connectors like this:
Other possible connectors include HDMI (High-Definition Multimedia Interface) video, VGA (Video Graphics Adapter) video, USB-3, external SATA (Serial ATA), serial, parallel.
Modern motherboards consume more power and consequently give off more heat than computers of former years. Intel in response designed the BTX form factor, but it has not yet caught on.
Power supplies often come bundled with the case. Spend a little extra to get good quality and a slightly higher rating than necessary. A flaky power supply will cause no end of odd glitches.
Cases are usually sold without any fans. You will need to get at least one.
Cases, disks, motherboards etc. usually come without a full complement of screws and connectors. Before the sale, make sure these are all included.
Modern computers are pretty idiot proof. Connectors are keyed and colour coded. However, cases are another matter. They have over a dozen separate connections that each must be painstakingly hooked up. This is quite ridiculous. it is a major factor in the cost of assembling a computer. There should be one plug that connects everything.
Usually all the little wires you need to connect all the USB (Universal Serial Bus) ports on the back panel to various spots on the motherboard are not included. Either you need to buy some separately, or mark the connections as not functioning. Otherwise later you will be very puzzled when you plug you mouse into one of the unconnected ports and it does not work.
You need tiny fingers for this job. Borrow a child.
The connections are almost never documented. You have to take the case apart to see where wires go, use a continuity meter and just plain experiment. Happily getting it wrong will rarely cause permanent damage, just frustration. With LED (Light-Emitting Diode) s, if the light does not work try attaching it the other way around. Happily, switches are not polarity sensitive.
Ask your case dealer to fill in a sheet like this on all the case connections. This sample chart is for a case 17" tower case I bought from DTI computers.
| Case Connections | |
|---|---|
| disk activity LED | red + and white - |
| power on LED | green + and white - |
| reset switch | blue + and white - |
| ATX power switch | orange + and white -. This is a low voltage switch to control the main AC (Alternating Current) power switch. |
| USB port | red +5V power (Vcc), green + data, white — data, black ground |
| speaker | red +, black - |
The back plate where the keyboard and other connectors poke through has mysterious little projections. These are to hold the plate in place by spring pressure against the back of the motherboard. They are not intended to be bent and wrapped around anything.
Disks need good air circulation. Try to arrange empty bays top and bottom and a good air flow unimpeded by cables. You might even consider a fan dedicated to cooling your disk drives.
You must make sure your motherboard upgrade fits your case. Originally cases were all large enough to handle any size motherboard. Now the match is much tighter.
| Motherboard Sizes | |||
|---|---|---|---|
| Form Factor | Metric Size | Imperial Size | Aliases |
| width × depth | width × depth | ||
| Mini-ITX | 17 × 17 cm | 6.69 × 6.69 in | |
| Mini-DTX | 20.30 × 17 cm | 7.99 × 6.69 in | |
| Taille Micro-ATX | 24.40 × 17 cm | 9.61 × 6.69 in | |
| Flex-ATX | 22.90 × 19.10 cm | 9.02 × 7.52 in | |
| DTX | 20.30 × 24.40 cm | 7.99 × 9.61 in | |
| Pico-BTX | 26.70 × 20.30 cm | 10.51 × 7.99 in | |
| Micro-ATX | 24.40 × 24.40 cm | 9.61 × 9.61 in | Embedded ATX, µATX, M-ATX |
| Micro-BTX | 26.40 × 26.70 cm | 10.39 × 10.51 in | µBTX, M-BTX |
| Baby-AT | 33 × 21.60 cm | 12.99 × 8½ in | |
| ATX | 30½ × 24.40 cm | 12.01 × 9.61 in | Standard ATX |
| BTX | 32½ × 26.60 cm | 12.80 × 10.47 in | |
| XL_ATX | 34.30 × 26.20 cm | 13½ × 10.31 in | Ultra-ATX |
| E-ATX | 30½ × 33 cm | 12.01 × 12.99 in | Extended ATX |
| AT | 35 × 30½ cm | 13.78 × 12.01 in | Standard AT |
| WTX | 35.60 × 42½ cm | 1.17 × 1.39 ft | Workstation ATX, WATX |
I refer to the depth as the distance from the front of the motherboard to the back where the slots and connectors are. I refer to the width as the distance between the two sides of the motherboard. Others may refer to these as the length and width or width and length. To figure out which terminology a given vendor is using, the bigger number is the width and the smaller the depth.
Make two Dymo sticky labels:
and
Put the first on the cover for the side of the motherboard’s components. Put the second one on the cover for the side of the motherboard’s underside. This will help you figure out which panel goes on which side and which way is up. Later it will tell you which side to open to add some RAM (Random Access Memory).
This page is posted |
http://mindprod.com/bgloss/case.html | |
Optional Replicator mirror
|
J:\mindprod\bgloss\case.html | |
Please read the feedback from other visitors,
or send your own feedback about the site. Contact Roedy. Please feel free to link to this page without explicit permission. | ||
| Canadian
Mind
Products
IP:[65.110.21.43] Your face IP:[18.191.108.168] |
| |
| Feedback |
You are visitor number | |